Happy New Year everyone,
I’ve been busy today making some new embroidery projects, ready for sale. You see it all started last week, whilst at work, when one of the vendors vacated their spot at the shop. So I had one of those brainwaves or moments and thought .. oh, I could take that ... so I decided to ask the store owner if I could secure the section that had just become available to sell some of my own handmade creations. Up until now I haven’t been in a position to do this, but now felt like the right time had come and I should grab this opportunity, if I was allowed. I was given the green light ... so I have been buzzing to get started on some stuff.
I decided to embroider some hand towels. I picked on a couple of designs that I had recently purchased online, that didn’t require too many thread changes to get me started. Let me know what you think?
This was my first design, “Coffee Lover” in a heart shaped monogram from Stitchtopia.
Using brown thread, closest to the colour of coffee, I proceeded to load the thread onto my machine. Checked my bobbin thread was good too and enough to complete such a project. Good pointer here, take a look at the size of the design on your machine, then put a ruler over the area you want the design to be over and if the size is bigger than the area in question, then you need to press the size icon, and then press the icon showing a box with arrows pointing inwards to decrease it, or outwards, if you want to go larger.
Hooped my towel, using a tear away stabilizer, and my brand new magnetic hoop I got for Christmas 🎄 from my wonderful husband, Gary - thank you 😘 Xx

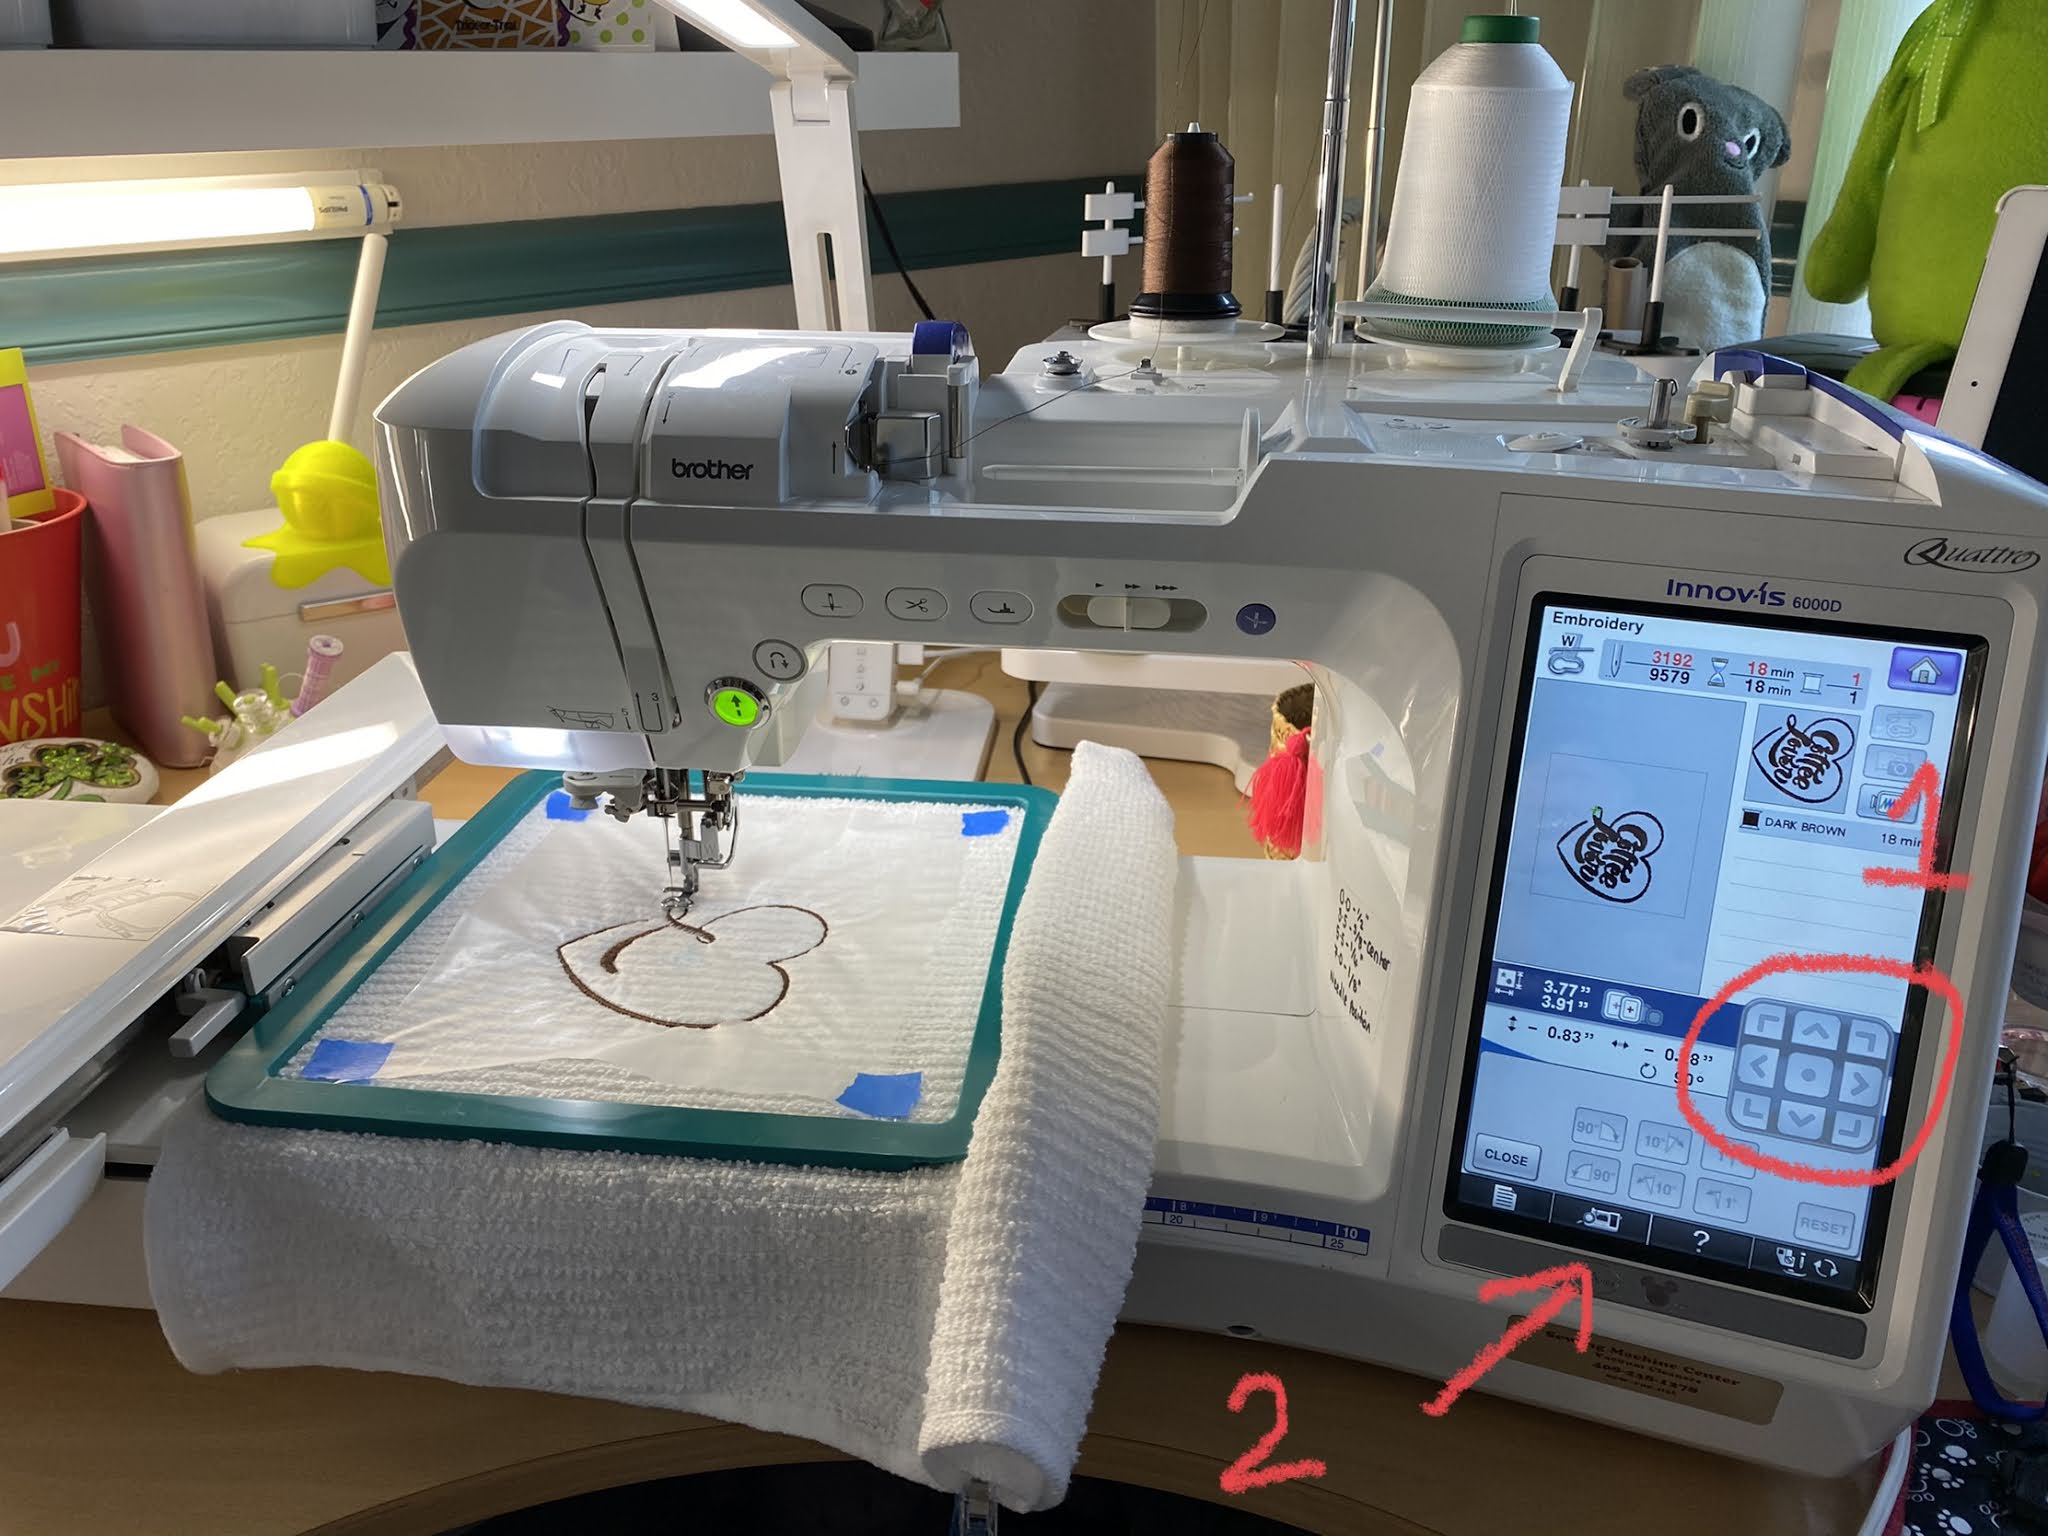
Before placing my towel in the hoop I wanted to find the middle point of where I wanted my design to be stitched. I always try to embroider the opposite end to the where any label is, the label indicates to me this is the bottom of my towel. So I turn the towel over, this is my top, working the opposite end to the label, fold the towel end up, towards the middle crease and finger press to create a fold line which is like a quarter way up on the towel, then unfold and fold the towel right side on top of left side and finger press the center fold in the area the other fold was made to locate the middle. I could have used an iron here, if the lines had not been too defined, but this towel was thin enough that I could make out my middle point. Unfold and with a ruler, make a cross through the center point with a fabric pen to indicate the middle. Before loading towel into magnetic hoop, I take care not to distort the towel lines so design stitches our straight and the toweling stays straight too. Once loaded up I take my hoop over to my machine and load it on. Important point here, if you need to rotate your design, now is the time to do so, the picture on the screen helps to see which way round it will stitch out. I use the rotate button if I need to turn the design round. I use quilt clips to hold my rolled up excess towel in place too. Then using my machine I find my center point of my towel - the cross made with fabric pen, using the arrow buttons. The photo attached shows 1) the buttons to press to move needle position around design to center point and 2) press this button, with presser foot down, and this machine’s camera feature appears on screen and you can move needle position, using the arrow buttons, to the exact center of cross and view on screen.
Once I’m happy I’ve found where I want the center of my design to be, I placed a piece of wash away stabilizer over the top and taped it down with some masking tape. The reason I’m using wash away stabilizer, is so my stitches don’t sink into the toweling. The stabilizer helps them to sit on top of the toweling. Now I’m ready to press the green button to start stitching out my design. To do this, I just lower the presser foot, my thread is already threaded, my needle is new, I checked my bobbin thread was good too, so I knew everything is good. And here we go ....
I’m ready to remove hoop from my machine, I take it over to my ironing board as it’s a good height to work at when dealing with removing stabilizer and threads not required. Snip any threads away not meant to be there and remove as much tear away stabilizer as possible, carefully.
My towel is finished and ready for the wash. This will help to remove any wash away stabilizer and hopefully any small tear away I wasn’t able to remove with scissors.
I was feeling accomplished at finishing my first towel, so on to another.
This time I used a design from Embroidery Online called “Think Pink” here is a link to their store. I found this amongst their “Dollar Designs” under their Specials tab, that’s right $1.
Here are some photos, following the same process as I did for Coffee Lover
You can see from this photo, the size of the design, how it looks on screen is how it will stitch out on my towel, how many stitches this design has, how many color thread changes there are.
And here are the finished towels.
I’m excited to hopefully find designs people will want to buy and this will incentivize me to push myself even more.
Thanks for stopping by and if you made it this far, let me know in the comments where you are viewing this page from, I’d love to hear from you. Don’t be afraid to master your embroidery machine, once you feel like you’re cracking that nut, it’s very satisfying and enjoyable to use. Always do a practice piece before setting out to embroider a towel or item of clothing so you can be sure your machine is working well and everything looks good. I’m still finding my way with my machine too. Oh, by the way, I love my new magnetic hoop 🙌🏻 A must have !!!
😊👋